Controller | ||||||||||||||||||||||||||||||||||||||||||
| ||||||||||||||||||||||||||||||||||||||||||
| ||||||||||||||||||||||||||||||||||||||||||
Controller is an interactive part in Scrap Mechanic.
Overview[ | ]
The Controller allows for precise control of Bearings and Pistons. It is activated using a connected Trigger or Driver's Seat.
Usage[ | ]
The Connect Tool is used to connect the Controller to Bearings, Pistons, and a Trigger or Driver's Seat. Up to ten Bearings/Pistons and one Trigger or Driver's Seat may be connected to a single Controller.
UI Information[ | ]
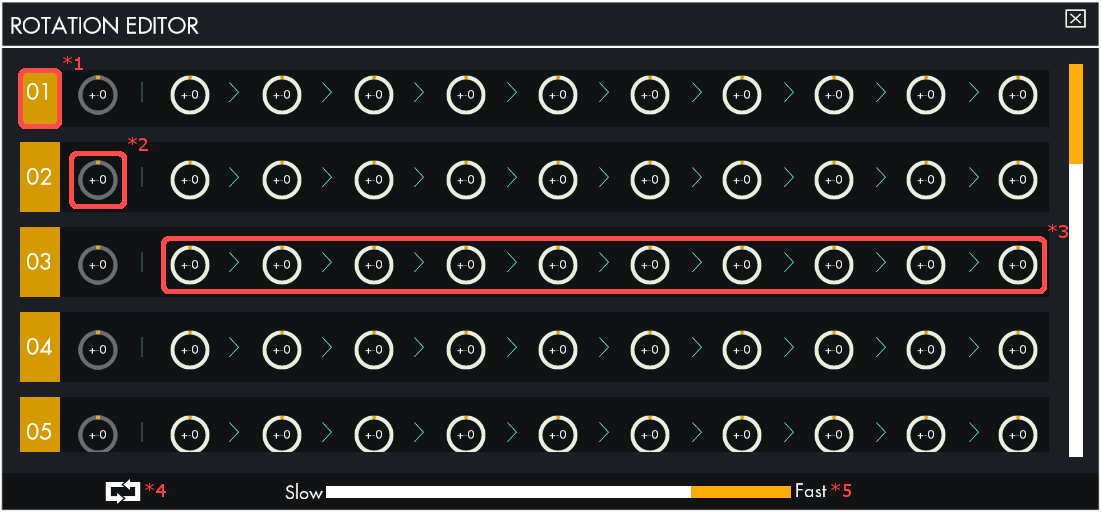
1. Connection Order Number: This number corresponds to a Bearing or Piston that is connected to the Controller. This number is indicated on the connection point of the Bearing or Piston.
2. Frame 0: The starting position of the Bearing or Piston (before a signal is sent to the Controller).
3. Frames 1-10: Set the amounts by which Bearings will be rotated, in degrees, and the total lengths that Pistons will extend. When a signal is sent to the Controller, it will move through the programmed sequence from left to right.
- The setting at each frame (#2 and #3) can be edited by clicking and dragging to the left or right. Bearing rotation settings are adjusted by 15 degrees at a time; single degree adjustments can be made by holding Shift.
4. Loop: Enabling loop mode will cause the Controller to repeat the sequence after reaching the last adjusted frame. When loop mode is not enabled, sending a signal to a Controller will cause it to stop at the last frame, and taking away the signal will cause the sequence to run in reverse until the starting position is reached.
5. Speed: Sets the speed of the Controller. There are 9 speed settings.
Speed Settings[ | ]
Increasing the speed setting lowers the time it takes for the Controller to complete each frame.
| Speed setting | Frame time (seconds) |
|---|---|
| 1 | 5 |
| 2 | 4.5 |
| 3 | 4 |
| 4 | 3.5 |
| 5 | 3 |
| 6 | 2.5 |
| 7 | 2 |
| 8 | 1.5 |
| 9 | 1 |
Frame time is constant and is based on the speed setting of the Controller. It is not affected by Bearing rotation or Piston length settings.
Advanced Usage[ | ]
- A connected Bearing has a rotation direction indicated on its connection point. The direction can be switched by right-clicking the connection point.
- When a Controller is connected to a Driver's Seat, pressing W (default) will play the sequence forward, and pressing S (default) will play the sequence backward.
- More precise rotation can be achieved by using small degree increments with the loop feature.
- Stopping a Controller in loop mode will cause it to go back to the last completed frame.
- A Controller can be used with Sensors to create timed events.
Crafting[ | ]
 |
 |
 |

|
| 5 | 5 | 1 | 3 |

| |||
| 00:40 00:22 (Level 5) | |||

| |||
|
| |||

| |||
| 1 | |||
Upgrades[ | ]
Controllers can be upgraded using Component Kits to unlock higher speed settings and more connections.
| Level | Cost | Total Cost | Connections | Speed Settings |
|---|---|---|---|---|
| 1 | 1 | 1 | 1 | 2 |
| 2 | 2 | 3 | 2 | 3 |
| 3 | 3 | 6 | 4 | 5 |
| 4 | 5 | 11 | 8 | 7 |
| 5 | 10 | 21 | 10 | 9 |
History[ | ]
Beta[ | ]
- 0.4.0
- Updated texture.
Alpha[ | ]
- ???
- Added Controller.